Best & Recommended settings to run Genshin Impact on Intel-based GPU PC
Playing Genshin Impact with Intel-based GPU PC? Well, why not?!
- Discover tweaks that enables running Genshin Impact comfortably on PC with onboard Intel-based Graphics.
- Find controller recommendation for playing Genshin Impact on PC.
- For other interesting articles, head to: Genshin Impact, Gaming & Games, Android, iOS, FREE games & stuffs, how-to and more at JILAXZONE
On Genshin Impact’s official page for PC minimum requirement spec to run this game (here is the official link), Intel-based GPU was never mentioned, however that doesn’t mean you cannot run Genshin Impact on PC with just Intel graphics. I have tried a few combinations and so far it works great. So let me walk you through on the settings I set on my Intel-GPU laptop.
The reason I’m writing this article is because I believe out there, there are many people who would like to try playing Genshin Impact – since not only the game is good and the fact that it is FREE to play – but may not have a good hardware to run it and get discouraged when seeing Genshin Impact’s official page for PC minimum requirements. By saying good hardware, I mean those PC with NVIDIA/AMD graphic cards. With some tweaking on the Windows settings, people with Intel-GPU computer can actually enjoy Genshin Impact game without much compromise.
Intel-GPU Computer Spec
Before coming to the tweak portion, let me show you my computer spec, so at least you get the idea on the hardware I’m using to run and play Genshin Impact comfortably.
| CPU | Intel Core i5 8th Gen (8265U @1.6GHz). Do note, U-series processor is meant for mobile/laptop which is designed for longer lasting battery. |
| RAM | 8GB |
| OS | Windows 10 Pro 64bit |
| GPU | Onboard Intel UHD Graphics 620 |
| Gamepad | iPega 9083 (Bluetooth) With this tweak. |
I have Genshin Impact installed and run from an external USB 3.0 HDD (non SSD) connected to my PC USB 3.0 port.
In case you are interested with the same controller I use, here’s the links to get it.
iPega 9083: For playing PC and Android games. I like it because the fact that it can be used both on PC and Android without much hassle (driver auto- detected and installed), plus when I’m playing any Android game, I can put my Android in between – just like a Nintendo Switch.
On Amazon:
Alternative link in case you can’t see the link above: iPega 9083 Amazon link.
On AliExpress:
 IPEGA 9083
Alternative link in case you can’t see the link above: iPega 9083 AliExpress link.
Note: If you buy anything from Amazon / AliExpress using links above, I will earn a small commission at no extra cost charged on your purchases.
Genshin Impact: Best and Recommended settings to run the game on Intel-based GPU PC
All the tweaks below is based on the computer specs mentioned above, running on Windows 10. If you are using a different Windows version, the steps below may not be exactly the same on the version of Windows you are running, so in case you can’t find it, try asking on comment below or do Google.
1) Turn Game mode on.
To turn on Game mode, press Windows button, then go to Settings > Gaming > Game Mode. Turn it ON. Enabling game mode prevents Windows update from performing driver installation and sending restart notification and more importantly to get a more stable frame rate during gaming.
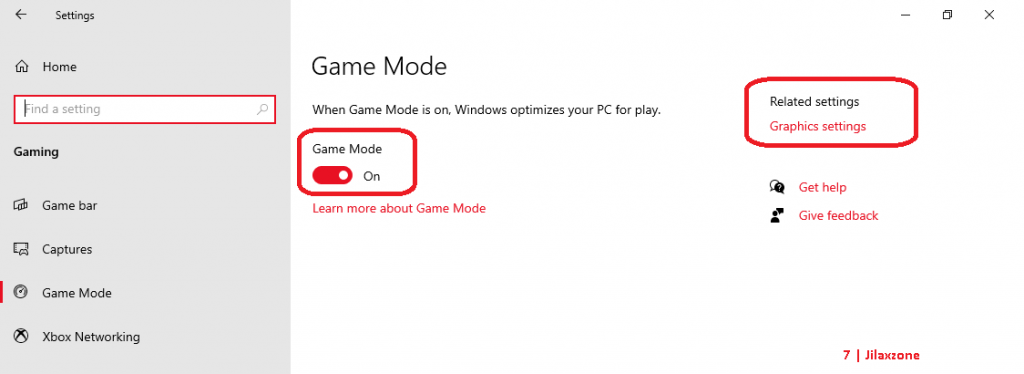
2) Set Graphics settings for Genshin Impact to priority high performance.
Still on the same Game Mode menu, on the top right, you’ll see the “Graphics settings”, click on it. Click “Browse”, then find and select GenshinImpact.exe.
If you install Genshin Impact on default location, GenshinImpact.exe should be located under this folder: C:\Program Files\Genshin Impact\Genshin Impact game. GenshinImpact.exe is the actual game executable.
Once GenshinImpact.exe has been added to the list, click on “Options”. On the pop-up window, select “High Performance”. Click on “Save”.
Article continues below.
Popular on JILAXZONE today:
3) Set GPU Performance to max performance.
To set GPU Performance to max performance, do press Windows button, then go to Settings > System > Power & Sleep.
On the top right on the window, find “Additional power settings” and click on it. On the current power plan selected, click “change plan settings”. Then on the Change Setting window, at the bottom find “change advanced power settings” and click on it.
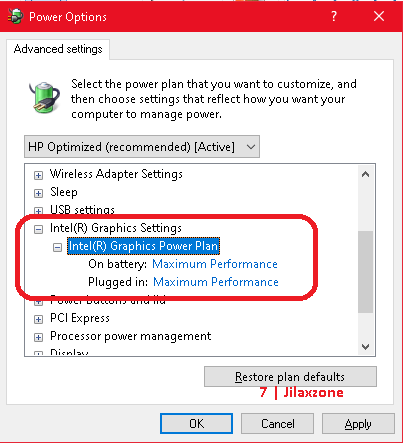
On Power Option window, find “Intel (R) Graphics Settings”, expand the option. Change the power plan to “Maximum performance”. (Recommended to change both plugged in and on battery, so if you are using laptop and on battery, you’ll still get maximum performance).
4) Lower Computer Resolution.
The lowest resolution you can get and comfortable with, the easier the GPU will process during screen rendering which translates to a faster game played. I would recommend to go with 1024×768 resolution for good performance (Or if in your case, your PC is still suffering from performance issue, consider to lower the resolution to 800×600).
To set computer resolution, from Windows desktop screen, do right click then click on “Display Resolution”. Under Display Resolution, change to 1024×768 then click on “Keep changes”.
5) Close all (unused) programs and services.
To free up Computer CPU and RAM, best is to close everything you don’t use while playing the game, that includes programs and services (such as service to sync-up Microsoft OneDrive). Anyway you are going to play Genshin Impact and focus on the game. The programs and services you are going to close, you can always restart them again after done playing Genshin Impact.
The easiest to check which programs and services running on the Windows is by checking it from the Task Manager. Press Ctrl+Alt+Del, then click on “Task Manager”. Under “Process” tab, end as many programs as you can. Go to “Details” tab, check if there’s anything you can close. Once done, keep task manager opened for the time being.
6) Start Genshin Impact.
Start running Genshin Impact like how you normally start it, but before clicking on the “Launch” button, hold the “Shift” button on your PC keyboard and while holding down “Shift” button, click on “Launch”. Keep pressing “Shift” until you see Genshin Impact configuration window.
On Genshin Impact configuration window, under Graphics tab, change these:
| Screen resolution | 1024×768 (Or if in your case, your PC is still suffering from performance issue, consider to lower the resolution to 800×600) |
| Graphics quality | Fastest |
Then click on “Play!”. Let the game loads the data. While waiting, do the next step.
7) Set Genshin Impact Priority as Realtime in Task Manager.
Do this only after you have run Genshin Impact and have seen the “MiHoYo” logo on screen. Open Task Manager if you close it on the previous step. On Task Manager, go to “Details”, find “GenshinImpact.exe”.
Do right click on “GenshinImpact.exe”, select “Set Priority” then choose “Realtime”. When prompted, choose “Change priority”.
Unfortunately, you need to redo this last step, every time you play Genshin Impact.
Bring it all together
What are you waiting for? Just because you only owned Intel-based GPU desktop/laptop doesn’t mean you can’t enjoy and play Genshin Impact comfortably. Follow the tweaks above and enjoy playing!
Do you have anything you want me to cover on my next article? Write them down on the comment section down below.
Alternatively, find more interesting topics on JILAXZONE:
JILAXZONE – Jon’s Interesting Life & Amazing eXperience ZONE.
Hi, thanks for reading my curated article. Since you are here and if you find this article is good and helping you in anyway, help me to spread the words by sharing this article to your family, friends, acquaintances so the benefits do not just stop at you, they will also get the same goodness and benefit from it.
Or if you wish, you can also buy me a coffee:

Thank you!
Live to Share. Share to Live. This blog is my life-long term project, for me to share my experiences and knowledge to the world which hopefully can be fruitful to those who read them and in the end hoping to become my life-long (passive) income.
My apologies. If you see ads appearing on this site and getting annoyed or disturb by them. As much as I want to share everything for free, unfortunately the domain and hosting used to host all these articles are not free. That’s the reason I need the ads running to offset the cost. While I won’t force you to see the ads, but it will be great and helpful if you are willing to turn off the ad-blocker while seeing this site.