iPhone Tips: Here’s how to record ProRes video using external storage (complete with recommended accessories to go!)
Taking your iPhone Photography to the next level!
- This article shares with you how you can record ProRes video on your iPhone into External Storage (SSD or Flash Drive) directly.
- Check out also recommended setups and accessories to go along with your iPhone photography journey.
- For other interesting articles, head to: iOS Tip & Trick, Games, FREE games & stuffs, how-to and more at JILAXZONE.
- If you find this article / content inside is already obsolete, do let me know by commenting on the comment section below so that I can update the article to reflect the latest process/news. Thanks.
When Apple released iPhone 15 Pro and iPhone 15 Pro Max months ago, few of the key highlights were the camera, USB-C charging port and its new ability to “plug and play”, do recording from the iPhone camera direct to the external storage. So if you are here for the how-to record video on your iPhone using external storage, well, then you are on the right place. Because I have recommended setups for you – regardless who you are – a starter in iPhone photography or a (to-be) professional iPhone photographer.
Feel free to jump around to section that interest you the most. In case you have any questions, feel free to ask on the comment section down below.
What is ProRes Video?
Introduced back in 2007, Apple ProRes (or in short “ProRes”) is a high quality, visually lossless, lossy video compression format developed by Apple used in post-production (from Wikipedia page here). In short, it’s a format that capture impressive image quality (read more on Apple ProRes here on Apple Support Page).
Meet Apple ProRes Log
While Apple has introduced ProRes video since the introduction of iPhone 13 Pro and iPhone 13 Pro Max, however with iPhone 15 Pro and iPhone 15 Pro Max, Apple introduced another codec: ProRes Log (Log for logarithmic). This ProRes Log encoding retains more information in the file, providing additional flexibility when editing color and making adjustment after the video is captured. Log will appear flat and grey before processing adjustments are made.
Record ProRes Video from iPhone on external storage
Moreover, with iPhone 15 Pro and iPhone 15 Pro Max, Apple opened up the possibility to record the ProRes video direct to the external storage. And this is what I’m going to go through in this article.
Here’s why you want to record ProRes video into External Storage
The 3 main reasons why you want to use External Storage on your iPhone to record ProRes videos are these.
Reason #1: Save your precious Internal Storage for something else
Be it installing games, apps or storing documents and photos. When it comes to video recording using ProRes format, capture directly the video into the External Storage, so well, you can use the internal storage for pretty much everything else!
Reason #2: Easily post-process the captured video on computer
Since the videos are recorded and stored directly on the external storage, so if you need to do post-processing using computer, it’s basically just removing the external storage from the iPhone and plug it to your computer. As simple as that. No transfer required between your iPhone and your computer.
Reason #3: Enable ProRes 4K at 60 fps video recording
By default, your iPhone 15 Pro and Pro Max able to capture videos on the following format using Internal storage:
| a) | 4K at 30 fps |
| b) | 4K at 25 fps |
| c) | 4K at 24 fps |
| d) | 1080p HD at 60 fps |
| e) | 1080p HD at 30 fps |
| f) | 1080p HD at 25 fps |
If you need a much smoother video, 4K at 60fps is the format to go. Yes, this format will only be available when you plug the compatible external storage to your iPhone 15 Pro and iPhone 15 Pro Max. If you don’t have external storage, well sorry, even if you have the 1TB model, the option can’t be used.
So be sure to check out the external storage recommendations section below!
Wrong Public Perceptions on iPhone recording video to External Storage – Clarified!
Just to be clear, since many wrong perceptions on this. You can record any video to external storage, so long these criteria are fulfilled:
Criteria #1: iPhone 15 Pro and iPhone 15 Pro Max
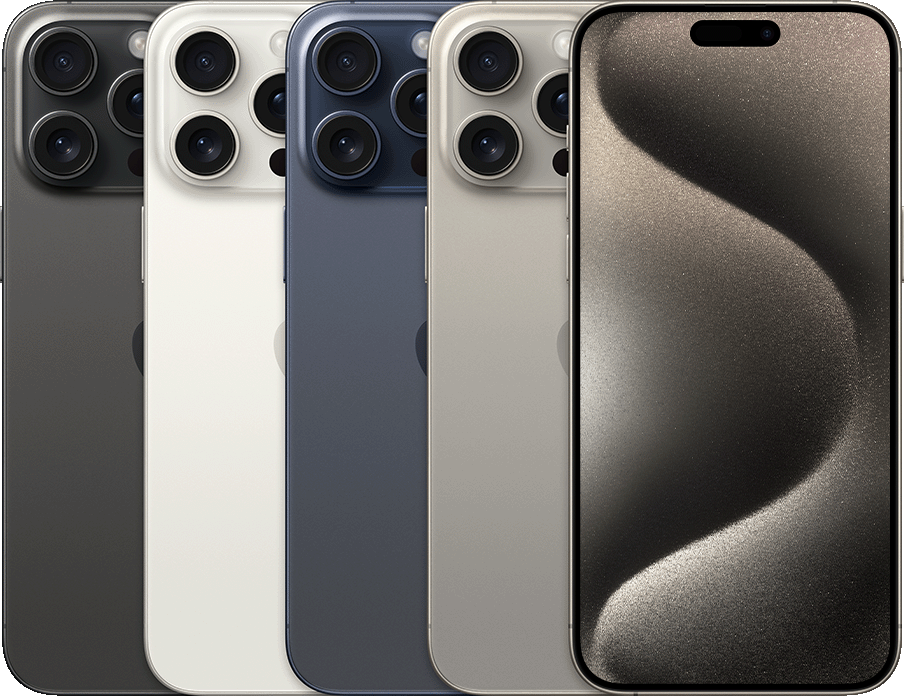
At the time this article is written, the latest and greatest iPhone is iPhone 15 Pro and iPhone 15 Pro Max. While on other iPhone you can plug and play external storage, however only on iPhone 15 Pro and iPhone 15 Pro Max, you can directly record the video from the Camera app.
Criteria #2: ProRes Video
You can only record to external storage if it’s a video in ProRes format – regardless of the encoding you choose: be it HDR, SDR or Log and regardless the resolution you choose (720p HD, 1080p HD or 4K).
Criteria #3: Compatible External Storage
Not all external storage is compatible. So be sure you are getting the compatible external storage. Do check “iPhone External storage Criteria for video recording” section below for details and recommendations.
Here’s how to record ProRes video into external storage on iPhone (including ProRes Log)
The prerequisite steps (one-time actions required)
To record videos in ProRes on your iPhone, here’s the prerequisites:
Step #1) On your iPhone, go to Settings > Camera > Formats.
Step #2) Inside Formats, under VIDEO CAPTURE, turn ON Apple ProRes.
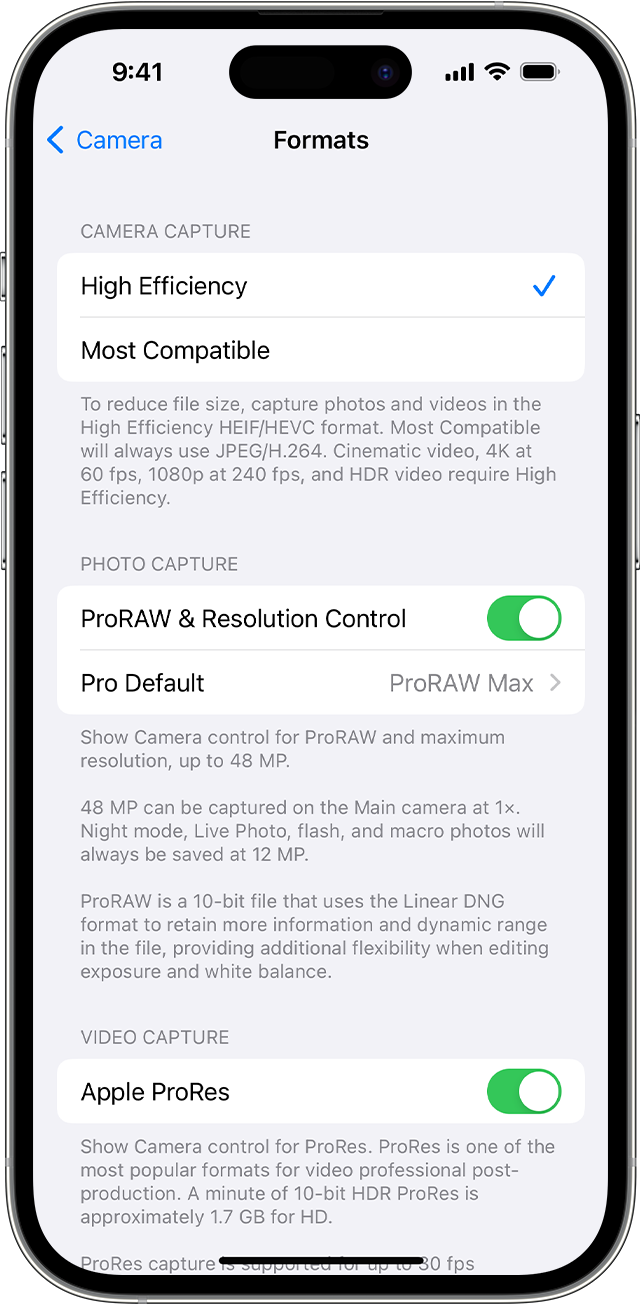
Step #3) Tap on “ProRes Encoding” and choose between SDR, HDR or Log.
Any video recorded using ProRes Log Encoding will appear flat and grey before processing adjustments are made, so get surprised. If you don’t know which one to choose, pick “HDR” as your default. As you learn more on the pros and cons of each encoding, then you can change to either SDR or Log.
Here’s how to record a ProRes video into External Storage
Ensure you have done the prerequisite steps above. Only once you have done the prerequisites above, then do these steps to record ProRes video directly into External Storage.
Step #1) Plug your compatible external storage – be it Thumb Drive or SSD. Do check out the recommendations below.
Step #2) Open Camera app.
Step #3) Inside Camera app, tap Video, to switch the camera to video.

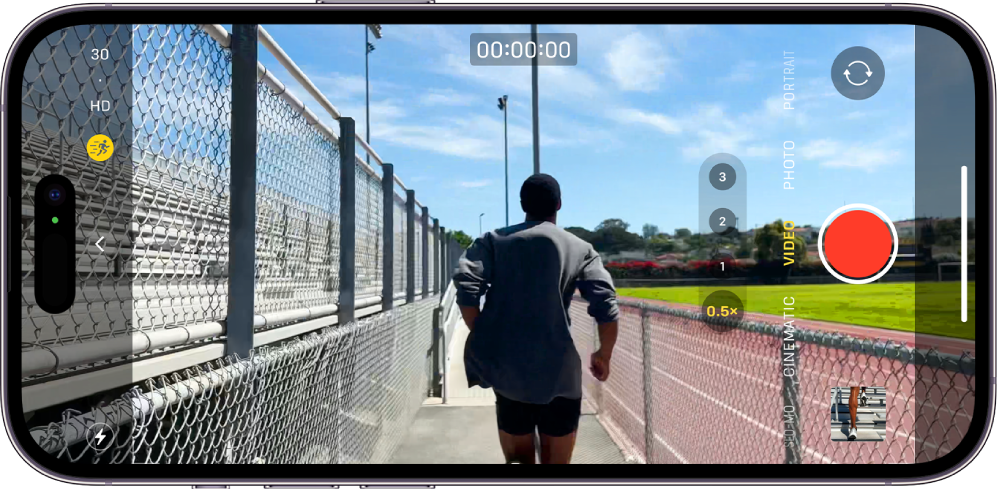
Step #4) Under Video, tap on “ProRes HDR” icon to turn it on. If you have plugged compatible external storage and turned on ProRes HDR successfully, you will see “USB-C” text below the red circle recording button and just above the white bar at the bottom of screen. You will also see the “Max Time” you can get by using the external storage.
| Attention! If you are getting “ProRes Not Supported – ProRes 4K at 60fps is only supported when recording to external storage devices.” error, that means the external drive is not connected correctly/successfully to your iPhone. Do check out the connection and ensure the external storage is plugged correctly and securely. |
Step #5) Tap the red circle recording button to start recording your video.
That’s it. Simple, isn’t it? Any videos recorded using the method above, will go direct to your External Storage – leaving your Internal Storage untouched!
Here’s how to check your ProRes video result recorded to external storage directly from your iPhone
There are a couple of ways to do this, however do ensure your external storage is still connected to iPhone.
From Camera app – the easiest way:
Step #1) On your iPhone, open Camera app.
Step #2) Tap the preview icon on the bottom left of the screen.
You’ll be redirected to the image preview screen.
From Files app:
Step #1) On your iPhone, open Files app.
Step #2) Go to Files app root folder, where you see “Browse” and “Locations” texts.
Step #3) Ensure your external storage is still plugged in.
Step #4) Find the external storage (it could be “Storage”, “SSD” or “Thumb Drive” or any name that you gave to it) and tap on it.
Step #5) Inside the external storage, go to DCIM > 100APPLE.
You should be able to find your ProRes video stored there.
iPhone External storage Criteria for video recording
While any external storage with USB-C interface should be compatible with iPhone 15 Pro and iPhone 15 Pro Max, however there are some criteria you should be aware of.
Criteria #1) Power Consumption max 4.5W
External Storage device with maximum Power consumption of 4.5W.
Criteria #2) Compatible format is APFS or exFAT.
Your external storage device must be formatted with APFS or exFAT. Password-encrypted drives aren’t supported. Sorry, no NTFS, Ext4 or FAT32.
Use the Files app to format your external storage device and manage your ProRes files.
Criteria #3) USB-C cable with 10 Gbps transfer rate.
Use a USB 3 cable with speed of at least 10 Gbits per second, especially if you want to record ProRes Log format at 4K 60fps. Check out below for USB-C cable recommendations.
FYI, the USB-C cable that comes with your iPhone 15 Pro or iPhone 15 Pro Max only support data transfer up to 400MB/s, so it’s not suitable for recording ProRes Log format at 4K 60fps.
Criteria #4) External Storage device with transfer speed at least 220MB/s
To record ProRes at 4K at 60 fps, need supports speeds of at least 220MB per second.
Your external storage device must write at speeds of at least 220 MB per second. If you attach a slower external storage device, you might get a Slow Recording Speed message.
Do check out “iPhone External storage recommendation” section to get the recommended external storage to use with your iPhone 15 Pro or iPhone 15 Pro Max.
iPhone External storage recommendation
While thumb drive or flash drive offers a convenient way to use (due to its small form factor), but they are not fast, and some doesn’t have big enough capacity. That’s when you need an SSD.
Samsung USB-C Flash Drive

| Capacity | 64GB, 128GBTB and 256GB |
| Read/Write Speed | 400MB/s |
| Interface | USB-C 3.2 Gen 1 |
| Weight | 0.12oz |
| Pros | Great for starter, connect to iPhone without additional cable, waterproof |
| Cons | Interface is still USB-C 3.2 Gen 1 |
| Where to get it | Check on Amazon |
SanDisk Ultra Dual Drive Go USB Type-C Flash Drive

| Capacity | 32GB, 64GB, 128GB, 256GB, 512GB and 1TB |
| Read/Write Speed | 400MB/s |
| Interface | USB-C 3.2 Gen 1 |
| Weight | 0.16oz |
| Pros | Colorful and small, connect to iPhone without additional cable |
| Cons | No IP rating, interface is still USB-C 3.2 Gen 1 |
| Where to get it | Check on Amazon |
Crucial X9 Pro

| Capacity | 1TB, 2TB and 4TB |
| Read/Write Speed | 1GB/s |
| Interface | USB-C 3.2 Gen 2 |
| Weight | 1.34oz |
| Pros | Small form factor, dust and splash proof |
| Cons | No color choice |
| Where to get it | Check on Amazon |
SAMSUNG SSD T7

| Capacity | 500GB, 1TB and 2TB |
| Read/Write Speed | 1GB/s |
| Interface | USB-C 3.2 Gen 2 |
| Weight | 2oz |
| Pros | Sleek design, has 3 color choices (red, blue and grey) |
| Cons | No IP Rating (no dust/splash proof) |
| Where to get it | Check on Amazon |
SanDisk Extreme Pro Portable SSD

| Capacity | 1TB, 2TB and 4TB |
| Read/Write Speed | 2GB/s |
| Interface | USB-C 3.2 Gen 2 |
| Weight | 2.72oz |
| Pros | IP65 water and dust resistance |
| Cons | A bit heavy |
| Where to get it | Check on Amazon |
Note: If you buy anything from Amazon / AliExpress using links above, I will earn a small commission at no extra cost charged on your purchases.
Recommended Accessories for your iPhone Video Recording
Depending on who you are and how you want to use your iPhone 15 Pro and iPhone 15 Pro Max – be it no-fuss, minimalist or Pro, check out the recommended accessories to go.
| Setup | Recommendation |
|---|---|
| No-fuss setup | Use Flash Drive only. |
| Minimalist setup | Use SSD with MagSafe sticker. |
| “Pro” setup | Use SSD with Smartphone Rig. |
Check out the recommended accessories for your iPhone 15 Pro and iPhone 15 Pro Max video recording.
Salex MagSafe sticker

If you need a MagSafe sticker that has a strong magnet, this is the choice.
| Where to get it | Check on Amazon |
Nillkin Magsafe Wall Mount Magnetic Shower Phone

Alternative for MagSafe sticker.
| Where to get it | Check on Amazon |
Rixmie USB-C cable (5in and 40Gbps transfer rate)

Transfer Speed is up to 40Gbps and length is 5 inch.
| Where to get it | Check on Amazon |
SmallRig – Small Rig. Big Dream

Check out their mobile cage series that comes with double handle design, and multiple extension ports, for sure to bringing your iPhone video recording to the next level
| Where to get it | Check on Amazon |
BeastGrip – grip used by Apple to capture Tim Cook’s video

Weighing 15.16oz (0.43KG), this grip is the one used by Apple staffs during their iPhone 15 photoshoots and video making. The grip enables you to add-on additional lenses for your iPhone camera.
| Where to get it | Check on Amazon |
That’s all the recommended accessories to bring your iPhone photography to the next level.
Bring it all together
So that’s it how you can record ProRes video direct to external storage using your iPhone 15 Pro or iPhone 15 Pro Max. Which setup are you getting? For my case, while getting the rig for iPhone is very tempting, however I would love to go with Minimalist setup – a 2TB SSD with MagSafe sticker and short USB-C cable. Reason: If it’s in public space, I don’t think I’m brave enough to show my rig with all the complications to the public. Moreover, even I’m dared to show them off, they are going to be very heavy in totality (iPhone + Rig + SSD + PowerBank + External Mic). What about you?
In case any questions, do let me know. In case you encountered any difficulties and/or have queries, don’t hesitate to put your queries or thoughts on the comment section down below. I’ll be happy to assist.
Interested to see other iPhone and iOS tips and tricks? Check them out here: iPhone and iOS tips and tricks at JILAXZONE.
Do you have anything you want me to cover on my next article? Write them down on the comment section down below.
Alternatively, find more interesting topics on JILAXZONE:
JILAXZONE – Jon’s Interesting Life & Amazing eXperience ZONE.
Hi, thanks for reading my curated article. Since you are here and if you find this article is good and helping you in anyway, help me to spread the words by sharing this article to your family, friends, acquaintances so the benefits do not just stop at you, they will also get the same goodness and benefit from it.
Or if you wish, you can also buy me a coffee:

Thank you!
Live to Share. Share to Live. This blog is my life-long term project, for me to share my experiences and knowledge to the world which hopefully can be fruitful to those who read them and in the end hoping to become my life-long (passive) income.
My apologies. If you see ads appearing on this site and getting annoyed or disturb by them. As much as I want to share everything for free, unfortunately the domain and hosting used to host all these articles are not free. That’s the reason I need the ads running to offset the cost. While I won’t force you to see the ads, but it will be great and helpful if you are willing to turn off the ad-blocker while seeing this site.