
FREE and Easy way to enable HTTPS on your WordPress website and blog | Let’s Encrypt | Bitnami | AWS
This guide works great on AWS Bitnami WordPress Linux instance running on Apache web server with Let’s Encrypt SSL Certificate to enable HTTPS on your WordPress website and blog. If you are using something different, you may need to adjust the steps mentioned below. But should you encounter issues, don’t hesitate to throw me your queries, I’ll be gladly try to help my best to solve any of your issues.
To create Let’s Encrypt SSL Certificate and use it on your WordPress website/blog
I’m running WordPress using AWS, Bitnami (read here) and using Lego client as a way to get the SSL certificate.
1) Go to your Linux console and login, either via SSH, Putty or anything else possible.
2) Run the following command to turn off all Bitnami services: sudo /opt/bitnami/ctlscript.sh stop
3) Run the following command to register a new Let’s Encrypt SSL Certificate and generate the certificates:
sudo /opt/bitnami/letsencrypt/lego –tls –email=”this_is@email.com” –domains=”jilaxzone.com” –domains=”www.jilaxzone.com” –domains=”www.jilaxzone.com” –path=”/opt/bitnami/letsencrypt” run
Do replace email with your email.
Do replace domains with your domain. You can add multiple domains and subdomain (as long as they are under one domain).
Leave the path as default.
4) Run the following command to replace any existing SSL Certificates with the new one you just generated:
sudo mv /opt/bitnami/apache2/conf/server.crt /opt/bitnami/apache2/conf/server.crt.old
sudo mv /opt/bitnami/apache2/conf/server.key /opt/bitnami/apache2/conf/server.key.old
sudo mv /opt/bitnami/apache2/conf/server.csr /opt/bitnami/apache2/conf/server.csr.old
sudo ln -sf /opt/bitnami/letsencrypt/certificates/jilaxzone.com.key /opt/bitnami/apache2/conf/server.key
sudo ln -sf /opt/bitnami/letsencrypt/certificates/jilaxzone.com.crt /opt/bitnami/apache2/conf/server.crt
Replace jilaxzone.com with your own domain.
5) Run the following command to give the new SSL Certificates proper access.
sudo chown root:root /opt/bitnami/apache2/conf/server*
sudo chmod 600 /opt/bitnami/apache2/conf/server*
6) Finally, run the following command to turn back on all Bitnami services: sudo /opt/bitnami/ctlscript.sh start
7) Now you can close your Linux console, and proceed to open your WordPress admin console. Login using user who can install new plug-in (user with admin access is highly recommended here)
8) Once logged in to WordPress admin, on the left menu, click on Plugins then Add New.
9) On Add Plugins page, head to search bar and type Really Simple SSL.
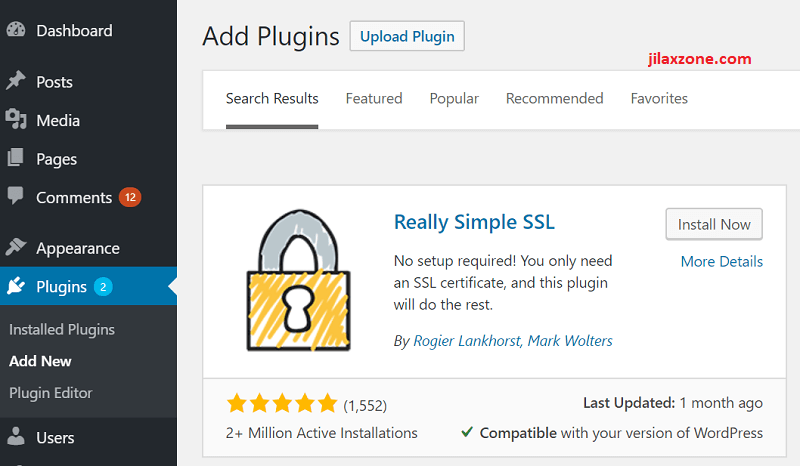
10) Once search result appear, click on Install Now to start installing the plug-in to the WordPress website.
11) Once installed, on the left menu, click on Settings then SSL.
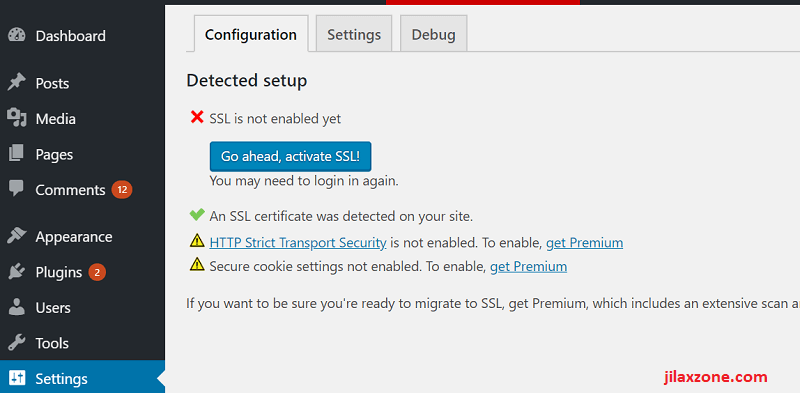
12) Under Configuration tab, if you did the setup correctly above, you should see “X SSL is not enabled yet” and “V An SSL certificate was detected on your site”. If you see this, then you are good to go. All you need to do is press that “Go ahead, activate SSL!” to enable HTTPS on your website.
Since it’s the first time your WordPress website turn from HTTP into HTTPS, you may need to press “Go ahead, activate SSL!” a few times especially if when you press it, your browser gets disconnected from your WordPress instance.
Once done, go ahead and try your WordPress website/blog using HTTPS.
To renew Let’s Encrypt SSL Certificate on your WordPress website/blog
Similar like how I create SSL Certificate, to renew I’m running WordPress using AWS, Bitnami (read here) and using Lego client as a way to renew the SSL certificate.
1) Go to your Linux console and login, either via SSH, Putty or anything else possible.
2) Run the following command to turn off all Bitnami services: sudo /opt/bitnami/ctlscript.sh stop
3) Run the following command to renew existing Let’s Encrypt SSL Certificate and generate the certificates:
sudo /opt/bitnami/letsencrypt/lego –tls –email=”this_is@email.com” –domains=”jilaxzone.com” –path=”/opt/bitnami/letsencrypt” renew –days 90
Do replace email with your email.
Do replace domains with your domain. You can add multiple domains and subdomain (as long as they are under one domain).
Leave the path and 90 days as default.
4) You should see [your domain here] Server responded with a certificate. Which means you have successfully renewed Let’s Encrypt SSL Certificate for the next 90 days.
5) Finally, run the following command to turn back on all Bitnami services: sudo /opt/bitnami/ctlscript.sh start
Do you have anything you want me to cover on my next article? Write them down on the comment section down below.
Alternatively, find more interesting topics on JILAXZONE:
JILAXZONE – Jon’s Interesting Life & Amazing eXperience ZONE.
Hi, thanks for reading my curated article. Since you are here and if you find this article is good and helping you in anyway, help me to spread the words by sharing this article to your family, friends, acquaintances so the benefits do not just stop at you, they will also get the same goodness and benefit from it.
Or if you wish, you can also buy me a coffee:

Thank you!
Live to Share. Share to Live. This blog is my life-long term project, for me to share my experiences and knowledge to the world which hopefully can be fruitful to those who read them and in the end hoping to become my life-long (passive) income.
My apologies. If you see ads appearing on this site and getting annoyed or disturb by them. As much as I want to share everything for free, unfortunately the domain and hosting used to host all these articles are not free. That’s the reason I need the ads running to offset the cost. While I won’t force you to see the ads, but it will be great and helpful if you are willing to turn off the ad-blocker while seeing this site.