AWS Lightsail: Easy Fix for AWS Lightsail Instance Stuck on Pending Status
- This article shared detailed the steps to fix AWS Lightsail Instance that gets stucked on Pending status.
- For other interesting articles, do check it out here AWS, WordPress, Gaming & Games, Android, iOS, Tech or more at JILAXZONE.
- If you find this article / content inside is already obsolete, do let me know by commenting on the comment section below so that I can update the article to reflect the latest process/news. Thanks.
Your AWS Lightsail instance stuck on “Pending” status and you just have “Basic” support – no techical support team to direct support you? Don’t worry, I’ve got the fix for your AWS Lightsail instance.
This was happened to me last time for not sure what was the reason, but for sure my AWS Lightsail instance running Bitnami wordpress suddenly not responsive and stuck on the “Pending” status and causing my WordPress website unable to run. What’s more unfortunate is that I didn’t have technical support from AWS (I didn’t buy their technical support package), after a few trials here and there, I was able to fix my AWS Lightsail instance back to “Running” status. And that’s the reason I’m writting this article: to share with you – AWS Lightsail users – who happen to get your instance stuck on “Pending” status.
Here’s how to fix AWS Lightsail Instance that is stuck on “Pending” Status
Follow the steps provided here. Tested working on my own AWS Lightsail instance. My recommendation would be to use a Computer (instead of a smartphone / tablet) to do all the steps below.
All the steps provided here were run and tested on Windows 11.
Step 1) Login to AWS Lightsail
1a) Open your favorite browser and key in the following link to open AWS Lightsail.
1b) Login to your AWS Lightsail instance with the credential that has access to download SSH key.
Step 2) Select AWS Lightsail Instance stuck on Pending status
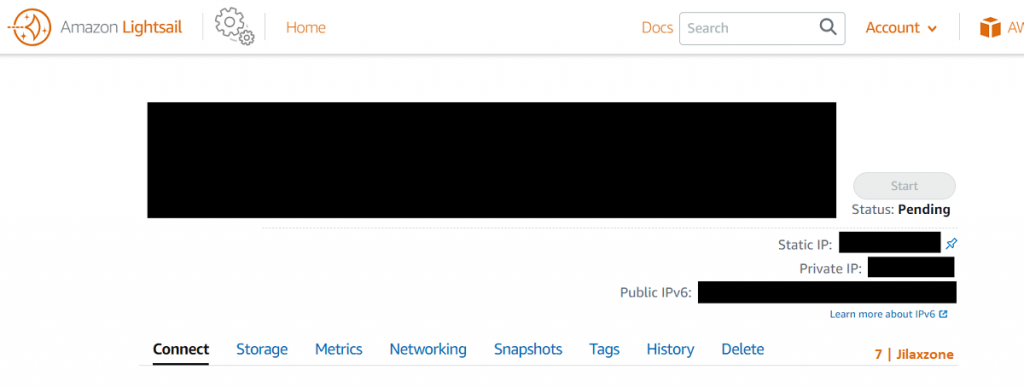
Once logged in, select the instance having issue. If you can’t click the instance, try clicking on the Public IP Address, then click on the troubled Lightsail instance.
Step 3) Take note the AWS Lightsail Instance Public IP Address
Inside the troubled AWS Lightsail Instance, do the following steps:
3a) Go to “Connect” tab.
3b) Inside Connect screen, take note on the Public IP Address as the Public IP Address is going to be used to connect to the instance from your Computer.
Don’t close the browser tab.
Step 4) Download the SSH Key
Still inside the troubled AWS Lightsail Instance, do the following steps:
4a) under “Connect” tab, find “Download Default Key”.
4b) Click on “Download Default Key” to download the SSH Key.
4c) A .pem file, labelled as “LightsailDefaultKey-xxxxx.pem” will be downloaded to your Computer (where xxxxx refers to your AWS region).
Don’t close the browser tab, leave the troubled AWS Lightsail Instance on your browser tab.
Step 5) Download PuTTYgen
PuTTYgen is going to be used to convert your .pem file into .ppk file – that’s going to be used to connect to your AWS Lightsail Instance via Command Line Interface (CLI).
Find and download PuTTYgen.exe (either 64-bit x86 or 32-bit x86 or 64-bit arm, select based on your Computer OS)
Step 6) Download Putty
If PuTTYgen is used for converting .pem file to .ppk file, PuTTY itself is used to connect to your AWS Lightsail Instance via CLI.
Find and download PuTTY.exe (either 64-bit x86 or 32-bit x86 or 64-bit arm, select based on your Computer OS)
Step 7) Run PuTTYgen
Follow these steps:
7a) Double click PuTTYgen.exe to start it.
7b) Click on “Load”.
7c) Click on “PuTTY Private Key Files (.ppk)” and select “All Files (*.*)”.
7d) Find and select “LightsailDefaultKey-xxxxx.pem” (where xxxxx refers to your AWS region). Then press Open.
7e) You’ll get notified that you “Successfully imported foreign key”. Click “OK”.
7d) Click on “Save private key” and click “Yes” when prompted with “Are you sure you want to save this key without a passphrase to protect it?”. Alternatively, click “No” if you want to key in the passphrase to it.
7e) Select the location you want to save the private key and you can give the private key any name you like. For easier reference on the rest of this article, I’m going to save it on “C:\Downloads” and use “AWSLightsailPrivateKey.ppk” as the name.
You can safely close PuTTYgen.
Step 8) Run PuTTY
Follow these steps:
8a) Double click PuTTY.exe to start it.
8b) On the left pane, navigate to Connection > SSH > Auth.
8c) Inside Auth screen, click on “Browse”.
8d) Find and select the private key. If you are following my recommendation, the file name would be “AWSLightsailPrivateKey.ppk”. Click “Open”.
8e) On the left pane, navigate to Session.
8f) Inside Session screen, under “Host Name (or IP address)”, key-in your AWS Lightsail Instance Public IP Address (see Step 3 above). Leave everything else as default.
8g) Click “Open”.
8h) A Command Line Interface (CLI) window will appear and prompt you to login. Depending on your OS, key-in the username accordingly and press “Enter”.
| OS & Username |
| Amazon Linux: ec2-user Amazon Linux 2: ec2-user Bitnami instances: bitnami CentOS instances: centos cPanel & WHM instances: centos Debian instances: admin FreeBSD: ec2-user openSUSE: ec2-user Plesk instances: ubuntu Ubuntu instances: ubuntu |
If you do this step correctly, you’ll be notified with “Authenticating with public key …” and you logged in to the AWS Lightsail CLI.
Step 9) Reboot AWS Lightsail Instance
Once logged in to your AWS Lightsail via CLI, now what you need to do is to reboot the instance.
9a) Type “sudo reboot” and press “Enter”.
9b) You’ll get disconnected from the CLI – that’s ok. Do wait for a couple of minutes (recommended 5 minutes).
After a couple of minutes, your AWS Lightsail instance should be turned off / stopped and then restarted.
Step 10) Check AWS Lightsail Instance
10a) Go back to your browser tab showing the troubled AWS Lightsail Instance.
10b) Check if now the status showing as “Running” and no longer “Pending”.
If you do all the steps correctly, you should see your AWS Lightsail instance now in “Running” status.
| Recommendation: 1) Don’t forget to close the PuTTY. 2) If you are using shared Computer, don’t forget to permanently delete the private key (“AWSLightsailPrivateKey.ppk”) and “LightsailDefaultKey-xxxxx.pem”. Failure to secure these 2 keys, means that you are giving access to your AWS Lightsail instance to anyone finding the keys. |
Bring it all together
So hopefully after running through all the steps provided above, your AWS Lightsail Instance is no longer stuck on “Pending” status but rather on “Running” status. In case you are having difficulties in any of the steps above, don’t hesitate to ask for help on the comment section down below. I’ll be happy to assist. Cheers!
For other AWS, AWS Lightsail, Bitnami, WordPress related articles, do check out AWS articles at JILAXZONE.
Do you have anything you want me to cover on my next article? Write them down on the comment section down below.
Alternatively, find more interesting topics on JILAXZONE:
JILAXZONE – Jon’s Interesting Life & Amazing eXperience ZONE.
Hi, thanks for reading my curated article. Since you are here and if you find this article is good and helping you in anyway, help me to spread the words by sharing this article to your family, friends, acquaintances so the benefits do not just stop at you, they will also get the same goodness and benefit from it.
Or if you wish, you can also buy me a coffee:

Thank you!
Live to Share. Share to Live. This blog is my life-long term project, for me to share my experiences and knowledge to the world which hopefully can be fruitful to those who read them and in the end hoping to become my life-long (passive) income.
My apologies. If you see ads appearing on this site and getting annoyed or disturb by them. As much as I want to share everything for free, unfortunately the domain and hosting used to host all these articles are not free. That’s the reason I need the ads running to offset the cost. While I won’t force you to see the ads, but it will be great and helpful if you are willing to turn off the ad-blocker while seeing this site.