iPhone Photography Tips: Take better pictures and videos with your just iPhone by utilizing all the built-in iPhone Camera features (including hidden ones!)
While some of iPhone camera features are pretty obvious to find, but there are actually a lot of “hidden” features left to be discovered!
One of the reasons people are buying iPhone is for its camera – be it to take photos or record videos. With each passing years, iPhone camera and lenses get more advances each year. But not only the hardware that gets the upgrade, its soul – the iOS also gets more matured as well with plenty of additional camera features – some of these camera features are pretty obvious to find and use while there are many left hidden to be discovered.
In this article, I would like to share those considered hidden iPhone camera features so you can utilize and maximize your iPhone camera to capture the best possible photos and videos.
- This article shares the all the built-in camera features you can use with your iPhone to get the best of your iPhone photography – works on both older models and latest iPhone models.
- For other interesting articles, head to: iOS Tips & Tricks, Games, FREE games & stuffs, how-to and more at JILAXZONE.
- If you find this article / content inside is already obsolete, do let me know by commenting on the comment section below so that I can update the article to reflect the latest process/news. Thanks.
iPhone camera tricks you can use to take better pictures and videos with your iPhone
Use the following guidelines to jump around to find which camera trick / feature you would like to get to know.
Tip 1) Enable Camera grid for better compositions | iOS 7, iPhone 4 and up
Tip 2) Quickly record a video, without changing camera modes (a.k.a QuickTake) | iOS 12, iPhone XR, XS and up
Tip 3) Use QuickTake but without holding the Shutter button | iOS 12, iPhone XR, XS and up
Tip 4) Use Burst Photos to capture best picture | iOS 14, iPhone 6S and up
Tip 5) Capture Square photo instead of the usual 4:3 | iOS 13, iPhone X and up
Tip 6) Capture Live moving photo | iOS 9, iPhone 6S and up
Tip 7) Create Long Exposure Photo | iOS 10, iPhone 6S and up
Tip 8) Enable iPhone camera to capture more photos (faster photo shooting) | iOS 14, iPhone X and up
Tip 9 Use Night Mode to capture photos in low-light environment | iOS 14, iPhone 11 and up
Tip 10) Take Mirrored Selfie | iOS 14, iPhone 6S and up
Tip 11) Take a more natural-looking Selfie | iOS 14, iPhone 12 and up
Tip 12) Take Night Mode Selfie | iOS 14, iPhone 12 and up
Tip 13) Adjust iPhone camera exposure manually | iOS 13, iPhone 11 and up
Tip 14) Improve your photo with Scene Detection | iOS 14, iPhone 12 and up
Tip 15) Take Macro photos and videos | Any iOS, any iPhone
Tip 16) Personalize photo with Photographic style Presets | iOS 15, iPhone 13 and up
Tip 17) Record video in Cinematic mode like Hollywood movies | iOS 15, iPhone 13 and up
Tip 1) Enable Camera grid for better compositions
To activate Camera grid so that you can better position your image, do the following steps:
| Feature is available since iOS 7. |
| Compatible iPhone: iPhone 4 and anything newer. |
Check out the following YouTube video by Simeseye.
a) Go to Settings > Camera.
b) Under COMPOSITION, turn on “Grid”.
c) Open Camera app. Now you should see the Camera interface will have vertical and horizontal lines forming a grid.
Tip 2) Quickly record a video, without changing camera modes (a.k.a QuickTake)
Urgently in need to quickly record video? Use QuickTake.
| Feature is available since iOS 12. |
| Compatible iPhone: iPhone XR, iPhone XS and any newer iPhone models. |
a) Activate iPhone camera from Lock Screen.
b) Tap and hold the Shutter button (white circle) button in “Photo” mode. It will start recording video. Alternatively, you can press “Volume Down” button to also start recording video.
Read the complete guide here: Quickly record a video without changing camera modes on your iPhone at JILAXZONE.
Tip 3) Use QuickTake but without holding the Shutter button
Using QuickTake but doesn’t want to keep holding the Shutter button?
| Feature is available since iOS 12. |
| Compatible iPhone: iPhone XR, iPhone XS and any newer iPhone models. |
a) Activate QuickTake mode (Tap and hold the Shutter button (white circle) button in “Photo” mode).
b) While in QuickTake mode, slide to the right to lock recording so that you can lift your finger from the shutter button.
Read the complete guide here: Quickly record a video on your iPhone without messing with the camera settings at JILAXZONE.
Tip 4) Use Burst Photos to capture best picture
Need to capture the whole moment to get the best picture? Use burst mode.
| Feature is available since iOS 9. |
| Compatible iPhone: iPhone 6S, iPhone 6S Plus and any newer iPhone models. |
Check out the following YouTube video by WebPro Education.
a) Open Camera app.
b) Using “Photo” mode, press the “Volume Up” button to start capturing photo in burst mode. You’ll start seeing the number of photos you have captured in burst mode (the shutter button will turn into numbers).
c) Once done capturing photo in burst mode, go to Photos app, select the photo you have just taken in burst mode, then tap “Select” at the bottom to select the best photo captured.
d) Select any photos that you like to keep by tapping on each photo you like to keep, then tap “Done”.
e) When prompted “Would you like to keep the other X photos in this burst?”, choose “Keep Only X Favorites” so that you’ll just save the best photos and remove the rest to save your iPhone storage.
Tip 5) Capture Square photo instead of the usual 4:3
Wanted to take Square photo?
| Feature is available since iOS 13. |
| Compatible iPhone: iPhone X and any newer iPhone models. |

a) Open Camera app.
b) Using “Photo” mode, tap the arrow up button, then tap on “4:3” and change it to “Square”.
c) Tap the Shutter button (white circle) button to capture the Square Photo.
Read the complete guide here: Here’s how to take square photo on iPhone at JILAXZONE and here: Here’s how to record square video on iPhone at JILAXZONE.
Tip 6) Capture Live moving photo
Live photo is a 3 seconds short video made as a photo (1.5 second before and 1.5 second after you shoot the camera), the idea is so that you can see photo being alive (it moves, before stopped at the captured image) and more importantly to ensure you won’t miss any good moments. With LIVE photo turned on, in case you missed any good moments, you can just reselect from the captured photo using the “Edit” menu on the Photos app.
| Feature is available since iOS 9. |
| Compatible iPhone: iPhone 6S, iPhone 6S Plus and any newer iPhone models. |

a) Open Camera app.
b) Using “Photo” mode, tap the Live Photo (3-circle) button located on top right of the iPhone screen to activate LIVE Photo – ensure the Live Photo (3-circle) button turned yellow and you see “LIVE” text on the middle of the iPhone screen.
c) Tap the Shutter button (white circle) button to capture the LIVE Photo.
Read the complete guide here: How to always get the best photo on every captures on your iPhone at JILAXZONE.
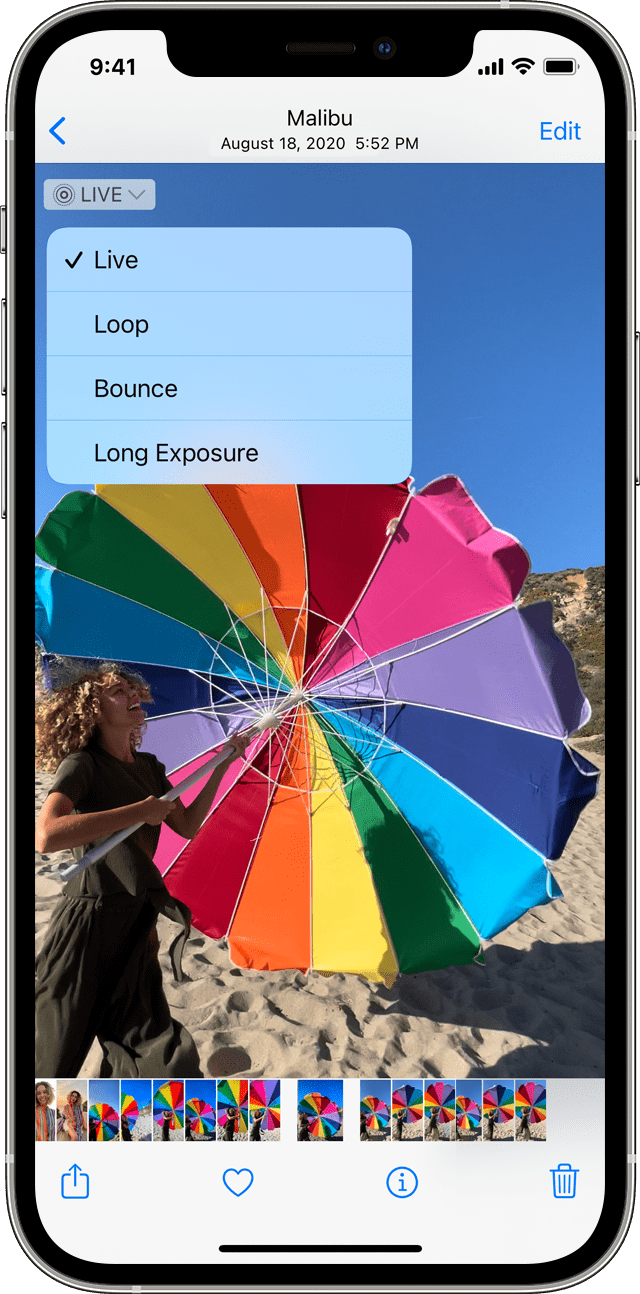
Tip 7) Create Long Exposure Photo
Wanted to create a long exposure photo where a waterfall becomes a smooth stream of water or cars’ tail lights become streaks across the streets? Just take a LIVE Photo and change it to Long Exposure. Here’s how you can do so.
| Feature is available since iOS 10. |
| Compatible iPhone: iPhone 6S, iPhone 6S Plus and any newer iPhone models. |
a) Open Camera app.
b) Using “Photo” mode, tap the Live Photo (3-circle) button located on top right of the iPhone screen to activate LIVE Photo – ensure the Live Photo (3-circle) button turned yellow and you see “LIVE” text on the middle of the iPhone screen.
c) Tap the Shutter button (white circle) button to capture the LIVE Photo.
d) Once done capturing LIVE Photo, go to Photos app, select the photo you have just taken in LIVE mode, then tap “LIVE” button located at the top left corner of your iPhone screen then select “Long Exposure”.
Your LIVE Photo is now changed to Long Exposure photo.
Tip 8) Enable iPhone camera to capture more photos (faster photo shooting)
Wanted to push your iPhone camera further by enabling it to capture more photos? Here’s how you can do so.
| Feature is available since iOS 14. |
| Compatible iPhone: iPhone XR, iPhone XS and any newer iPhone models. |
Check out the following YouTube video by ITJungles.
a) Go to Settings > Camera.
b) Under PHOTO CAPTURE, turn on “Prioritize Faster Shooting”.
c) Open Camera app.
d) Using “Photo” mode, rapidly tap the Shutter button (white circle) button to capture more photos.
iPhone will then intelligently adapt image quality when rapidly pressing the shutter button.
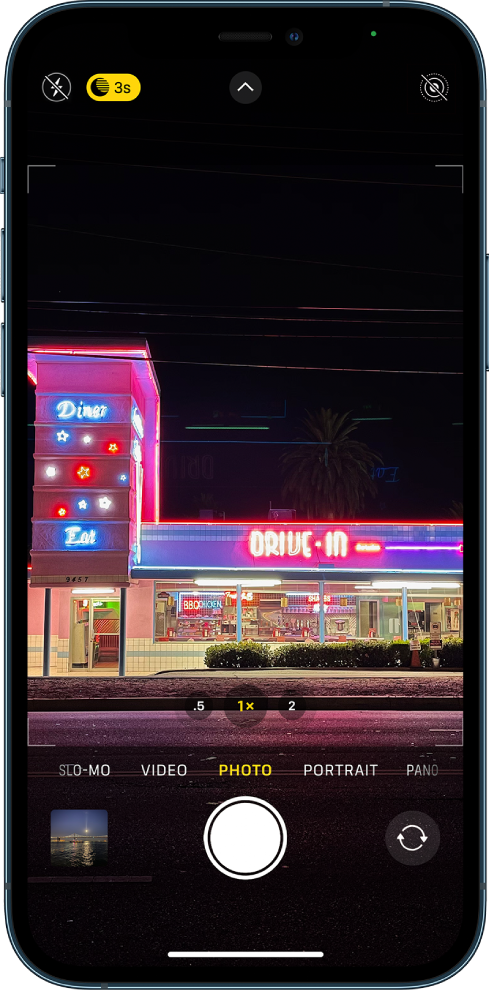
Tip 9) Use Night Mode to capture photos in low-light environment
Wanted more light when capturing photos in low-light environment?
| Feature is available since iOS 14. |
| Compatible iPhone: iPhone 11 series and any newer iPhone models. |
a) Open Camera app.
b) Next to flashlight icon on the top left corner of iPhone screen, you’ll see Night mode icon (moon inside circle). The icon will only appear on compatible iPhone models and only when low-light is detected. The Night mode icon turns yellow when the feature is active.
c) Tap the Shutter button (white circle) button to capture photo with Night mode turned on.
Tip 10) Take Mirrored Selfie
Want to have a different perspective from your Selfie? Take Mirrored Selfie. Here’s how to do so.
| Feature is available since iOS 14. |
| Compatible iPhone: iPhone 6S, iPhone 6S Plus and any newer iPhone models. |
Check out the following YouTube video by Ians Tech.
a) Go to Settings > Camera.
b) Under COMPOSITION, turn on “Mirror Front Camera”.
c) Open Camera app. Change the camera to Selfie camera (front camera).
d) Tap the Shutter button (white circle) button to capture your selfie.
The selfie photo captured should be mirrored.
Tip 11) Take a more natural-looking Selfie
Want a more natural-looking selfie?
| Feature is available since iOS 14. |
| Compatible iPhone: iPhone 12 series and any newer iPhone models. |
Check out the following YouTube video by ITJungles.
a) Go to Settings > Camera.
b) Under PHOTO CAPTURE, turn on “Lens Correction”. Turning this feature on will correct the lens distortion on the front camera making the selife to be more natural-looking.
c) Open Camera app. Change the camera to Selfie camera (front camera).
d) Tap the Shutter button (white circle) button to capture your selfie.
Tip 12) Take Night Mode Selfie
Want to have your selfie looks better during night time or during low-light condition? Use the Night Mode selfie.
| Feature is available since iOS 14. |
| Compatible iPhone: iPhone 12 series and any newer iPhone models. |
a) Open Camera app.
b) Switch the camera to the front camera by tapping on the camera switcher button (indicated by icon having two arrow formed a circle).
c) Next to flashlight icon on the top left corner of iPhone screen, you’ll see Night mode icon (moon inside circle). The icon will only appear on compatible iPhone models and only when low-light is detected. The Night mode icon turns yellow when the feature is active.
d) Tap the Shutter button (white circle) button to capture Night Mode selfie. Hold still your iPhone until the exposure time is up and your photo is fully taken.
Tip 13) Adjust iPhone camera exposure manually
Doesn’t like the preset exposure the camera set for you? You can easily adjust the exposure yourself using the Exposure Compensation Control. Here’s how to do it.
| Feature is available since iOS 13. |
| Compatible iPhone: iPhone 11 series and any newer iPhone models. |
Check out the following YouTube video by iPhone Photography School.
a) Open Camera app.
b) Using “Photo” mode, tap the arrow up button, then tap on “+-“ button to adjust the exposure level.
c) Tap the Shutter button (white circle) button to capture the Square Photo.
Tip 14) Improve your photo with Scene Detection
Would want to take your iPhone photos to the next level? Enable Scene Detection. Here’s how.
| Feature is available since iOS 14. |
| Compatible iPhone: iPhone 12 series and any newer iPhone models. |
a) Go to Settings > Camera.
b) Under PHOTO CAPTURE, turn on “Scene Detection”.
c) Now open Camera app.
d) Using “Photo” mode, tap the Shutter button (white circle) button to capture photos with Scene Detection turned on.
Using the intelligent image recognition, iPhone will then improve your photo based on the scene detected. You can try switching on and off this feature to notify the differences.
Tip 15) Take Macro photos and videos
Taking macro photos? Here’s how you can optimize the settings.
| Feature is available since any iOS, however it’s greatly enhanced on iOS 15. |
| Compatible iPhone: All iPhone models, however it’s greatly enhanced on iPhone 13 series or any newer iPhone models. |
Check out the following YouTube video by Benjamin Ward Tech.
Step a and b can be found only on iPhone 13 series or any newer iPhone and are optionals.
a) Go to Settings > Camera.
b) Under PHOTO CAPTURE, turn on “Auto Macro”. Turning this feature on will make compatible iPhone to automatically switch the camera to Ultra Wide camera to capture better macro photos and videos.
c) Now open Camera app.
d) Using “Photo” or “Video” mode, get closer to the object you want to capture, you’ll notice the camera will switch to the ultra wide camera. Tap the Shutter button (white circle) button to capture the macro photos or videos.
Read the complete guide here: Here’s how to take Macro photos on your iPhone (All models of iPhone, not just the latest one) at JILAXZONE.
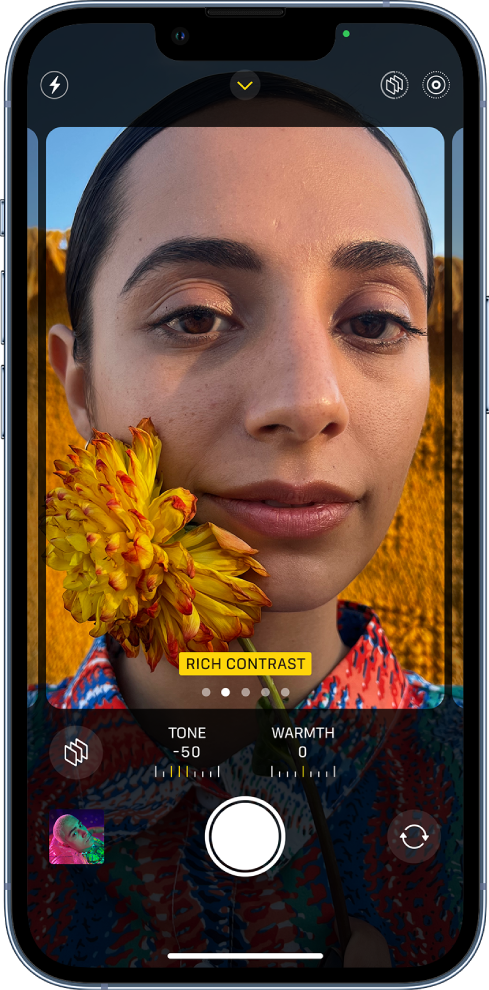
Tip 16) Personalize photo with Photographic style Presets
Personalize your photo with Photographic style – it behaves like a photo filter, the differences are photographic style is better and required to be preset before photo is taken.
| Feature is available since iOS 15. |
| Compatible iPhone: iPhone 13 series and any newer iPhone models. |
a) Open Camera app.
b) Using “Photo” mode, tap the arrow up button, then tap on “Photographic style” (3 square) button, located on bottom left of the iPhone screen and change the preset from Standard to either Rich Contrast, Vibrant, Warm, or Cool. If you want, you can further adjust the tone and warmth of the selected Photographic style.
c) Tap the Shutter button (white circle) button to capture the photo with the selected Photographic style.
Tip 17) Record video in Cinematic mode like Hollywood movies
Create stunning videos with blurring effects just like how Hollywood movies are, using Cinematic mode to create depth-of-field effect where you can point the focus on your video, so the focus will stays sharp while everything else goes blur.
| Feature is available since iOS 15. |
| Compatible iPhone: iPhone 13 series and any newer iPhone models. |
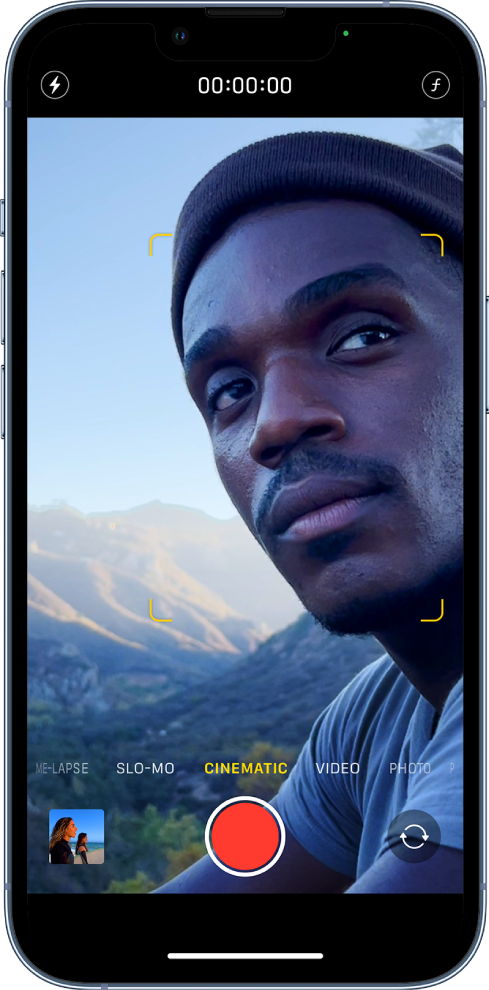
a) Open Camera app, then swipe to the left to and choose Cinematic mode.
b) Tap the red circle (record) button to start recording.
c) While recording:
- Single tap a subject in the viewfinder to change focus as you record.
- Double tap a subject to set automatic focus tracking on a subject.
- Tap and hold on the screen to lock the focus at a specific distance from the camera.
d) Tap the red circle (record) button again to stop recording.
Any videos recording using Cinematic mode, is labelled as “CINEMATIC” on Photos app.
Read the complete guide here: Mastering iPhone Cinematic mode: Here’s how you can record, edit and use all the available features for Cinematic video at JILAXZONE.
Bring it all together
Wait no more, give all of them a try – maximize your iPhone camera with all the tips and tricks shared above. Knows any other iPhone camera tips and tricks that I have not shared here in this article? Well, do share with the rest of us by commenting on the comment section down below. Also, in case you are encountering any difficulties and/or have any queries related to the iPhone photography, do reach me by commenting on the comment section down below. I’ll be happy to assist.
Interested to see other iPhone and iOS tips and tricks? Check them out here: iPhone and iOS tips and tricks at JILAXZONE.
Do you have anything you want me to cover on my next article? Write them down on the comment section down below.
Alternatively, find more interesting topics on JILAXZONE:
JILAXZONE – Jon’s Interesting Life & Amazing eXperience ZONE.
Hi, thanks for reading my curated article. Since you are here and if you find this article is good and helping you in anyway, help me to spread the words by sharing this article to your family, friends, acquaintances so the benefits do not just stop at you, they will also get the same goodness and benefit from it.
Or if you wish, you can also buy me a coffee:

Thank you!
Live to Share. Share to Live. This blog is my life-long term project, for me to share my experiences and knowledge to the world which hopefully can be fruitful to those who read them and in the end hoping to become my life-long (passive) income.
My apologies. If you see ads appearing on this site and getting annoyed or disturb by them. As much as I want to share everything for free, unfortunately the domain and hosting used to host all these articles are not free. That’s the reason I need the ads running to offset the cost. While I won’t force you to see the ads, but it will be great and helpful if you are willing to turn off the ad-blocker while seeing this site.