Mastering iPhone Cinematic mode: Here’s how you can record, edit and use all the available features for Cinematic video
One of the key features and selling points of the new iPhone 13 series and iOS 15 is the ability to capture and edit Cinematic videos. Apple marketed the feature as like having Hollywood class cinematographer in your pocket – which you can “use” whenever you want it and wherever you need it. In this article, I’m sharing all the available features and options on the new Cinematic mode feature so you can not-only capture videos in Cinematic mode but also maximize them and get the fullest of iPhone latest new feature resulting the best captured Cinematic video.
Now here’s what I meant by Cinematic video captured using Cinematic mode on iPhone:
- This article shares the steps how you can record and edit video taken in Cinematic mode directly on your iPhone.
- For other interesting articles, head to: iOS Tip & Trick, Games, FREE games & stuffs, how-to and more at JILAXZONE.
- If you find this article / content inside is already obsolete, do let me know by commenting on the comment section below so that I can update the article to reflect the latest process/news. Thanks.
What is Cinematic mode?
Cinematic mode is one of the modes available in your iPhone Camera app where you can record videos with a shallow depth of field and add beautiful focus transitions for a cinema-grade look.
Cinematic mode supports Dolby Vision HDR and currently can only record on 1080p resolution at 30fps.
Cinematic mode is new feature on iOS 15 and supported on the following devices:
| Type | Supported device |
|---|---|
| Creating Cinematic Video | iPhone 13 series and after |
| Editing Cinematic Video | iPhone XR, iPhone XS and after, including: iPad Pro 3rd Gen and after iPad Air 3rd Gen and after iPad Mini 5th Gen and after |
Here’s how to record video in Cinematic mode on your iPhone
1) Open Camera app, then swipe to the left to and choose Cinematic mode.
2) Tap the red circle (record) button to start recording.
3) While recording:
- Single tap a subject in the viewfinder to change focus as you record.
- Double tap a subject to set automatic focus tracking on a subject.
- Tap and hold on the screen to lock the focus at a specific distance from the camera.
4) Tap the red circle (record) button again to stop recording.
Any videos recording using Cinematic mode, is labelled as “CINEMATIC” on Photos app.
Some optional Cinematic mode settings you want to consider (put your iPhone is in landscape mode to access this), then tap the arrow (located near the FaceID camera) to show these adjustment options:
- Tap the “f” (Depth Control) button, to enable the slider to adjust the depth of field.
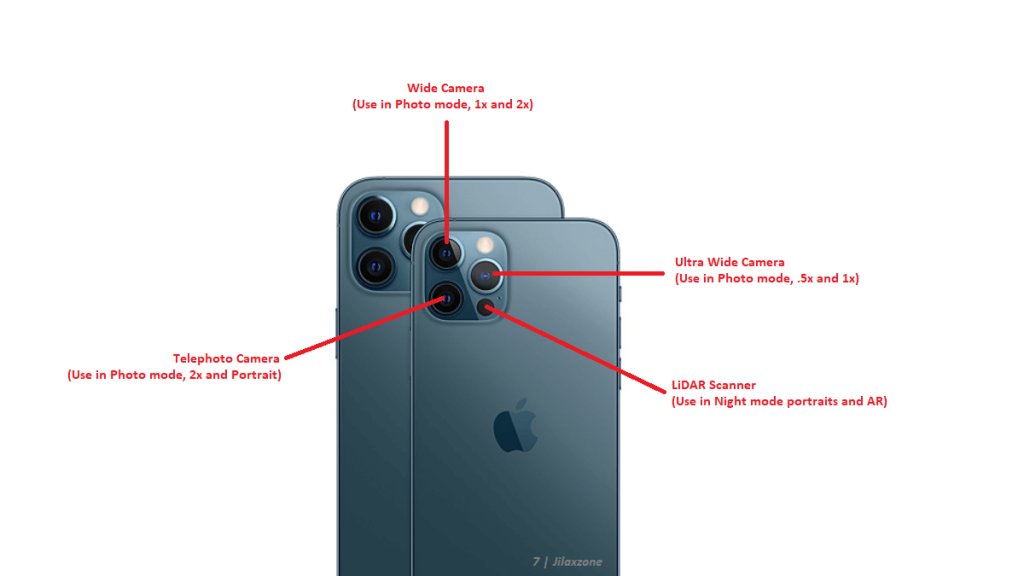
- Tap the “1x” button to switch to Telephoto lens. Tap the “1x” button again to switch back to Wide lens.
- Tap the “+-” (exposure) button, to enable the slider to adjust your video brighter or darker.
- Tap the “lightning” (flash) button, to configure flash whether Auto, On, or Off.
Here’s how to edit video taken in Cinematic mode on your iPhone
While capturing Cinematic video can only be done by iPhone 13 series and after, but to edit Cinematic video, that can be done on any supported iPhone or iPad – complete list you can get it on the above section – as long as your supported iPhone and iPad is running on iOS 15 or up.

There are 2 major things you can do to a video taken in Cinematic mode: 1) Edit the video depth of field and 2) Edit the video focus point.
How to edit depth of field in a video taken in Cinematic mode
1) Open Photos app, then tap the Cinematic video that you want to adjust.
2) Tap Edit to open the edit menu.
3) Tap the “f” (Depth Control) button to enable the slider to adjust the depth of field. Drag the slider to the depth of field you like. The adjustments made to depth of field affect the entire video.
4) Tap Done once you have done editing.
How to edit focus points in a video taken in Cinematic mode
1) Open Photos app, then tap the Cinematic video that you want to adjust.
2) Tap Edit to open the edit menu. You’ll see the video timeline below your video as well as yellow dot(s) indicating the moment in the video where the focus point changes from one subject to another subject.
3) Play the video or drag the timeline indicator button to run through your video. You’ll notice on your video: a yellow square and a white square. Yellow square is the video’s current focus while other subjects / objects recognized in the video are indicated by white square.
4) Tap any white square to change the focus point from existing focus point to that person or object you are selecting. Alternatively, you can do these:
- Single tap on any subjects / objects (regardless they have white square or not) to make them as your video’s focus point.
- Double tap a subject to set automatic focus tracking.
- Tap and hold on the screen to lock the focus at a specific distance from the camera.
- Tap and hold the yellow dot until the trash bin (delete) button appears to delete a focus point transition, tap on the trash bin (delete) button to confirm deleting the focus point transition.
5) Tap the yellow dot inside yellow square (focus) button to switch between automatic focus tracking and your manually selected focus points.
6) Repeat step 3) to step 5) for any other portion of the video where you want to change the focus point.
7) Once done, then tap Done.
Bring it all together
Fun isn’t it? Now you have learned and mastered how to capture and edit video in iPhone’s new Cinematic mode. In case you encountered any difficulties, don’t hesitate to submit your queries on the comment section down below. I’ll be happy to help and assists.
Interested to see other iPhone and iOS tips and tricks? Check them out here: iPhone and iOS tips and tricks at JILAXZONE.
Do you have anything you want me to cover on my next article? Write them down on the comment section down below.
Alternatively, find more interesting topics on JILAXZONE:
JILAXZONE – Jon’s Interesting Life & Amazing eXperience ZONE.
Hi, thanks for reading my curated article. Since you are here and if you find this article is good and helping you in anyway, help me to spread the words by sharing this article to your family, friends, acquaintances so the benefits do not just stop at you, they will also get the same goodness and benefit from it.
Or if you wish, you can also buy me a coffee:

Thank you!
Live to Share. Share to Live. This blog is my life-long term project, for me to share my experiences and knowledge to the world which hopefully can be fruitful to those who read them and in the end hoping to become my life-long (passive) income.
My apologies. If you see ads appearing on this site and getting annoyed or disturb by them. As much as I want to share everything for free, unfortunately the domain and hosting used to host all these articles are not free. That’s the reason I need the ads running to offset the cost. While I won’t force you to see the ads, but it will be great and helpful if you are willing to turn off the ad-blocker while seeing this site.