


Successfully installed Play! PS2 Emulator for iOS – let’s just call it Play! iOS – on your iPhone, iPad or iPod Touch but quickly get disappointed because no matter what games you tried, Play emulator always ended up crashing? You are not alone. I was super happy to learn that finally there’s a PS2 emulator for iOS & iPadOS, only to find out, it’s not working out-of-the-box. That’s the reason I’m writing this step by step guide, to share with you the workaround I did to make Play emulator to work on any iPhone, iPad or iPod Touch running on latest iOS & iPadOS.
- This tutorial detailed the steps to fix Play emulator crashing error, so that you can play PS2 games on your iPhone running on latest iOS.
- No jailbreak nor any forms of subscriptions is required.
- This tutorial though intended for iPhone, but all the steps provided here works and applicable for iPad as well as iPod Touch.
- For other interesting articles related to gaming, check it out here Play! iOS, PlayStation 2, Xbox, PS5, Nintendo Switch, other gaming, iOS, Tech or more at JILAXZONE.
- If you find this article / content inside is already obsolete, do let me know by commenting on the comment section below so that I can update the article to reflect the latest process/news. Thanks.
For other Play! iOS related articles, do check here: Play! iOS at JILAXZONE.
Play! iOS: The reason why Play Emulator keeps crashing
Like other modern emulator built to run on iOS, Play! iOS requires JIT to run. JIT is short for Just-In-Time compiler. It’s a method, like its name implies, to compile codes during execution, so the codes will then translated into device native code which resulted in faster performance. Apple quietly introduced this feature back in iOS 14.2. Many emulator starts making use of this feature because with JIT enabled, it greatly improves the emulator performance running on Apple devices. However knowing that people used the JIT feature outside what Apple initially intended (people are using it mainly for running emulators and VMs), Apple quickly pulled JIT out on iOS 14.4. That’s the reason, if you are on iOS 14.4 or above, you can’t get Play! iOS running out of the box.
This article will guide you on how you can bring back and enable JIT feature on latest iOS so you can run Play! iOS and play PS2 games on your iPhone, iPad or iPod Touch.
Play! iOS: Prerequisites
These are the things you need to prepare to before being able to run Play! iOS. If there are certain things you don’t have / don’t know yet, don’t worry, as part of the installation and configuration steps, all the download links and how to create / configured them are shared in details.
| # | Item required | Description |
|---|---|---|
| a | iPhone or iPad or iPod Touch | The main show. |
| b | Computer (either a Mac or PC) | Required to push JIT package from your Computer to run Play! iOS on your iPhone. |
| c | iTunes | Required to be installed on your Computer to install Play! iOS to your iPhone and to transfer games to Play emulator. |
| d | AltServer & AltStore | Required to be installed on your iPhone to get Play! iOS Package ID. If you don’t have AltStore yet on your iPhone, check this out: Here’s how to install AltStore: iPhone alternative App Store at JILAXZONE. |
| e | Lightning cable | Required to push JIT package from your Computer to run Play emulator on your iPhone. |
Play! iOS: Steps to fix Play Emulator crashing error on latest iOS
The following steps are to be done to fix Play emulator keep crashing error, regardless on which iOS version you are. The method I’m sharing you here is called “wired tether method”.
| The steps written here are tested on: a) Latest iOS – at the time this article is written is iOS 15 Public Beta 5 and using the iPhone that I currently have – iPhone XR. In case you are not on iOS 15 or iPadOS 15 yet, check the link here to get iOS 15 & iPadOS 15: Here’s how to update iPhone to iOS 15 today (iPad and iPod Touch included!) at JILAXZONE. b) Latest Windows – at the time this article is written is Windows 11 Pro Preview Build 22000.100 co_release. In you are also using Windows and would like to install Windows 11, check the link here to get them installed: Getting Windows 11 and installing on your Computer at JILAXZONE. Should you are using different version of iOS or iPadOS and / or different computer OS (such as Linux / Mac), the steps may be slightly different but should not deviate too much. Anyway, in case you have questions / issues, feel free to put them down on the comment section down below, I’ll be more than happy to help you. |
Step 1) Connect your iPhone and ensure iTunes recognize it
Plug in your iPhone to your Computer. Open iTunes if it’s not automatically opened. Ensure your iPhone is recognized by iTunes and shown up on iTunes.
Do NOT unplug your iPhone until the rest of the steps here.
Step 2) Download libimobiledevice
libimobiledevice is set of libraries to communicate with services on iOS devices using native protocols. You can get libimobiledevice from the following link.
| Download libimobiledevice | https://github.com/libimobiledevice-win32/imobiledevice-net/releases/ |
Choose zip file according to your Computer OS. Since I’m using Windows, so I downloaded the Windows version.
| For easier references throughout the article: 1) Regardless of the Computer version (whether Windows, Mac, or Linux), let’s just call the zip file downloaded from the link as “libimobiledevice.zip” 2) Since I’m using Windows and because different Windows Computer has different drive, for the rest of this article, I will use “D:\Programs\libimobiledevice” as the “libimobiledevice download folder”. You have the option to follow or use your own folder preference. |
Step 3) Navigate to “libimobiledevice download folder” and unzip the “libimobiledevice.zip”
Once downloaded into “libimobiledevice download folder” (inside “D:\Programs\libimobiledevice”), unzip “libimobiledevice.zip” file and place all the files into “libimobiledevice download folder” (inside “D:\Programs\libimobiledevice”).

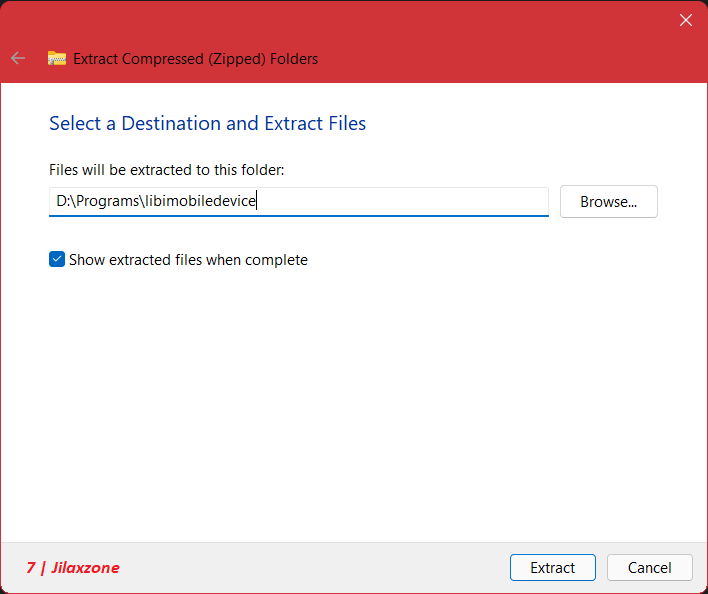
If you do it correctly, you should be able to see “idevice_id.exe”, “ideviceimagemounter.exe” and “idevicedebug.exe” under “libimobiledevice download folder” (inside “D:\Programs\libimobiledevice”).
Step 4) Open Command Prompt / Terminal, navigate to “libimobiledevice download folder”
On your Computer and assuming “libimobiledevice download folder” is located at “D:\Programs\libimobiledevice”, do the following:
Step 4a) Click on Windows button, type “Command Prompt”, then press Enter. Command Prompt window will then open.
Step 4b) Inside the Command Prompt window, type “D:” without the double quotes. Then press Enter. If your “libimobiledevice download folder” is different from mine, adjust the command yourself.
Step 4c) Inside the Command Prompt window, type “CD D:\Programs\libimobiledevice” without the double quotes. Then press Enter. If your “libimobiledevice download folder” is different from mine, adjust the command yourself.
If you are doing the steps correctly, now your Command Prompt should be showing the “libimobiledevice download folder” at “D:\Programs\libimobiledevice”.
Article continues below.
Popular on JILAXZONE today:
Step 5) Getting iPhone UDID via Command Prompt / Terminal
On your Computer and assuming “libimobiledevice download folder” is located at “D:\Programs\libimobiledevice”, do the following:
Step 5a) Inside the Command Prompt window, type “idevice_id.exe” without the double quote. Then press Enter.
Step 5b) Take note of the 25 character (including the “-“) of your iPhone UDID. The iPhone UDID is shown in this format: XXXXXXXX-XXXXXXXXXXXXXXXX (USB).


Step 6) Check and get Play! iOS Package ID.
On your iPhone, do the following:

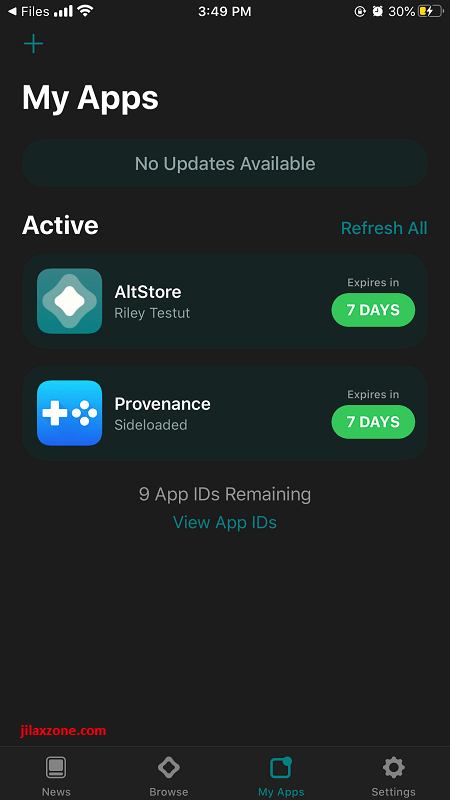
Step 6a) Open AltStore app, then navigate to My Apps. Tap on “View App IDs”.

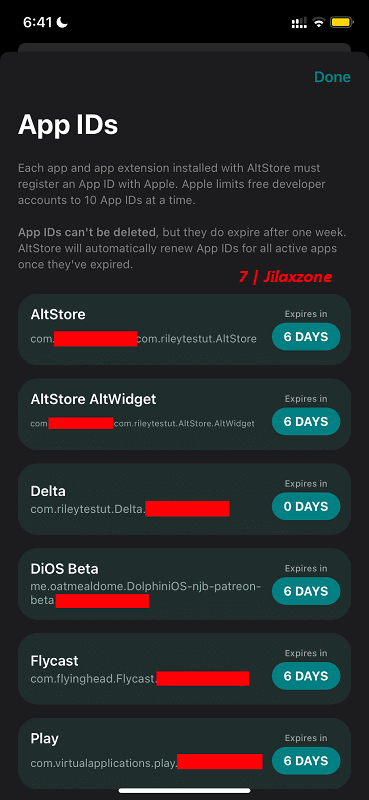
Step 6b) Find Play. Then write down the text you find underneath “Play”. It’s case sensitive, so be careful not to write them wrongly. This text is Play! iOS Package ID, which is unique on every device. The Play! iOS Package ID is shown in this format: com.virtualapplications.play.YYYYYYYYYY where YYYYYYYYYY refers to your unique Apple Developer Beta ID.
| Here’s the template for you, so you don’t need to write it from scratch. com.virtualapplications.play.YYYYYYYYYY Replace YYYYYYYYYY with your own device unique ID. |
Step 7) Download Developer Disk Image.
This image is used to inject the Just-In-Time (JIT) code / program into your iPhone. Download developer disk image according to your iOS version. For example: If you are like me, using iOS 15, then download the developer disk image for iOS 15.
On your Computer, do the following:
Step 7a) Open your Computer browser and click one of the links. For iOS 15, you can go to the Link #1 (link below) to get the developer disk image. For other iOS version, check both links to get your correct version.
Step 7b) Once you have found the correct version that match with your iOS version, download the zip file.
| Link # | Download Link |
|---|---|
| Link #1 | https://github.com/mspvirajpatel/Xcode_Developer_Disk_Images/releases/ |
| Link #2 | https://github.com/pdso/DeveloperDiskImage/tree/master |
If you are like me, using iOS 15, I download the 15.0.zip file.
| For easier references throughout the article: Due to different iOS version has different zip filename, for the rest of this article, let’s just call the whichever version of zip file as “developer disk image.zip”. |
Step 8) Unzip the “developer disk image.zip” into “libimobiledevice download folder”
On your Computer and assuming “libimobiledevice download folder” is located at “D:\Programs\libimobiledevice”, do the following:
Step 8a) Unzip “developer disk image.zip”.
Step 8b) Check the files generated. If you did it correctly, you should see 2 files: DeveloperDiskImage.dmg and DeveloperDiskImage.dmg.signature.
Step 9) Mount Developer Disk Image
This step requires your iPhone to be in unlock position with screen turned on. If the iPhone screen goes off, the process will fail and throw error.
On your Computer, with Command Prompt window is still opened and assuming “libimobiledevice download folder” is located at “D:\Programs\libimobiledevice”, do the following:
Step 9a) Inside the Command Prompt window, type “ideviceimagemounter.exe D:\Programs\libimobiledevice\DeveloperDiskImage.dmg” without the double quotes. Then press Enter.

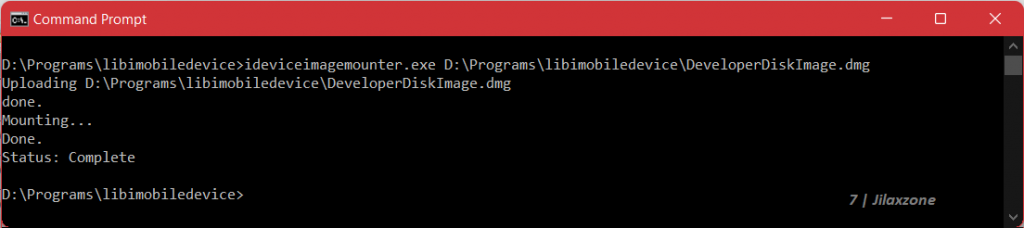
Step 9b) Ensure you are getting “Status: Complete” message on Command Prompt window after executing the previous step.
Step 10) Running iDeviceDebug
On your Computer, with Command Prompt window is still opened and assuming “libimobiledevice download folder” is located at “D:\Programs\libimobiledevice”, do the following:
Step 10a) Inside Command Prompt window, type “idevicedebug -u <iPhone UDID> –detach run <Play! iOS PackageID>” without double quotes.
Replace <iPhone UDID> with your Unique iPhone UDID (check Step 5).
Replace <Play! iOS Package ID> with your own unique Play! iOS Package ID (Check Step 6).
Step 10b) Press Enter to execute the command.
Step 10c) If you run the command correctly with correct iPhone UDID and correct Play! iOS Package ID, Play! iOS app – the PlayStation 2 emulator app – on your iPhone will open.


Congratulations! You just enable Just-In-Time (JIT) code on Play! iOS via wired tether process. Now, it’s time to celebrate is by playing any of your favorite PS2 games. At this moment, it’s safe to unplug your iPhone from your Computer.
| Suggestions: Because the whole configuration process is a tether process, in which if Play! iOS app on your iPhone is closed / killed, you need to redo the tether process in order to (again) run PS2 games, so I would suggest you to save these commands on your Computer, so whenever you need them, you just execute them. Here are the important commands for Command Prompt: > D: > CD D:\Programs\libimobiledevice > idevice_id.exe > ideviceimagemounter.exe D:\Programs\libimobiledevice\DeveloperDiskImage.dmg > idevicedebug -u <iPhone UDID> –detach run <Play! iOS Package ID> |
The original tethering guide was discovered by Jkcoxson and Spidy123222 for DolphiniOS (Nintendo Wii emulator for iOS), so all credits go to them. In this article, however, I have personally expanded the guide to be used for Play! iOS – the PlayStation 2 emulator for iOS – and by giving thorough explanations on each steps for easier reading and understanding, especially to those who are not geeky & not-so technical. In case you would like to see Jkcoxson and Spidy123222 original guide (but they are meant for DolphiniOS), you can refer to this link: https://docs.google.com/document/d/11_jju27qzhH_epq9XS1SlIlaBDPfvekRRYs5NS_ze_U/edit
Important things to note for Play! iOS
All the steps describe above is called (wired) tether method. Using tether method, it enables you to run Play! iOS app to play PS2 games on your iPhone as long as:
- Play! iOS app is active in AltStore (Play! iOS app will get inactive within the next 7 days), so don’t forget to refresh it. Refer here to refresh when it has been expired: Steps to refresh app inside AltStore when expired at JILAXZONE.
- Do NOT close nor kill Play! iOS app from the task switcher. If you accidentally close / kill Play! iOS app, you have to redo the tether process to continue playing PS2 games.
- Even if you don’t close / kill Play! iOS app yourself, whenever you are opening too many other apps on your iPhone, at one point, Play! iOS app will get closed automatically by iOS internal process. In that case, you have to redo the tether process.
Bring it all together


I have personally tested all the steps mentioned above on my iPhone XR running on latest iOS 15 and with Computer running Windows 11 and the result is I can get PlayStation 2 games to run. Few games I have tried personally were Final Fantasy X-2 and Zone of The Enders (image above), in which for both games, I can get good FPS (but they are still considerably slow, due to no FPS skipping). Final Fantasy X-2: 60 FPS on main screen, 38 FPS during battle, while Zone of the Enders, 42 FPS during game play.
So, follow the steps above to get your Play! iOS running and start playing great PS2 games! In case you have any queries or difficulties on this topic, don’t hesitate to ask by submitting your queries on the comment section down below, as I’ll be happy to help.
Do you have anything you want me to cover on my next article? Write them down on the comment section down below.
Alternatively, find more interesting topics on JILAXZONE:
JILAXZONE – Jon’s Interesting Life & Amazing eXperience ZONE.
Hi, thanks for reading my curated article. Since you are here and if you find this article is good and helping you in anyway, help me to spread the words by sharing this article to your family, friends, acquaintances so the benefits do not just stop at you, they will also get the same goodness and benefit from it.
Or if you wish, you can also buy me a coffee:


Thank you!
Live to Share. Share to Live. This blog is my life-long term project, for me to share my experiences and knowledge to the world which hopefully can be fruitful to those who read them and in the end hoping to become my life-long (passive) income.
My apologies. If you see ads appearing on this site and getting annoyed or disturb by them. As much as I want to share everything for free, unfortunately the domain and hosting used to host all these articles are not free. That’s the reason I need the ads running to offset the cost. While I won’t force you to see the ads, but it will be great and helpful if you are willing to turn off the ad-blocker while seeing this site.